Environments and Technologies Used
- Microsoft Azure (Virtual Machines/Compute)
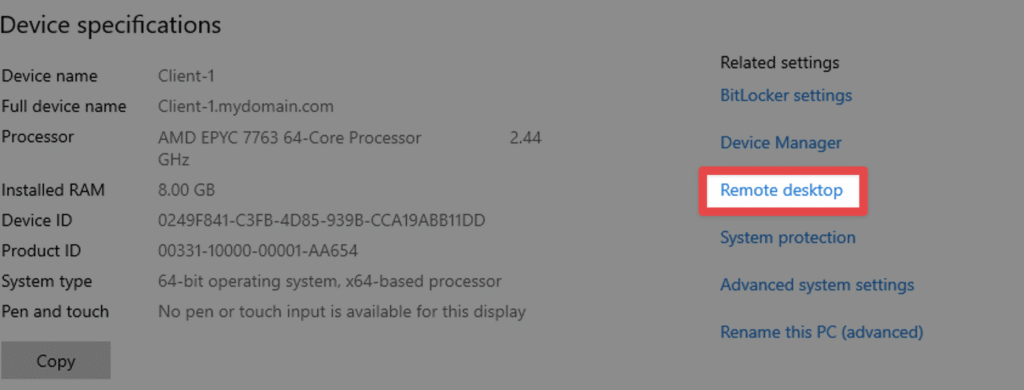
- Remote Desktop
- Active Directory Domain Services
- PowerShell
Operating Systems Used
- Windows Server 2022
- Windows 10 (21H2)
Deployment and Configuration Steps
Step 1: Setup Resources in Azure
- Create two virtual machines
- If you need help creating your virtual machines
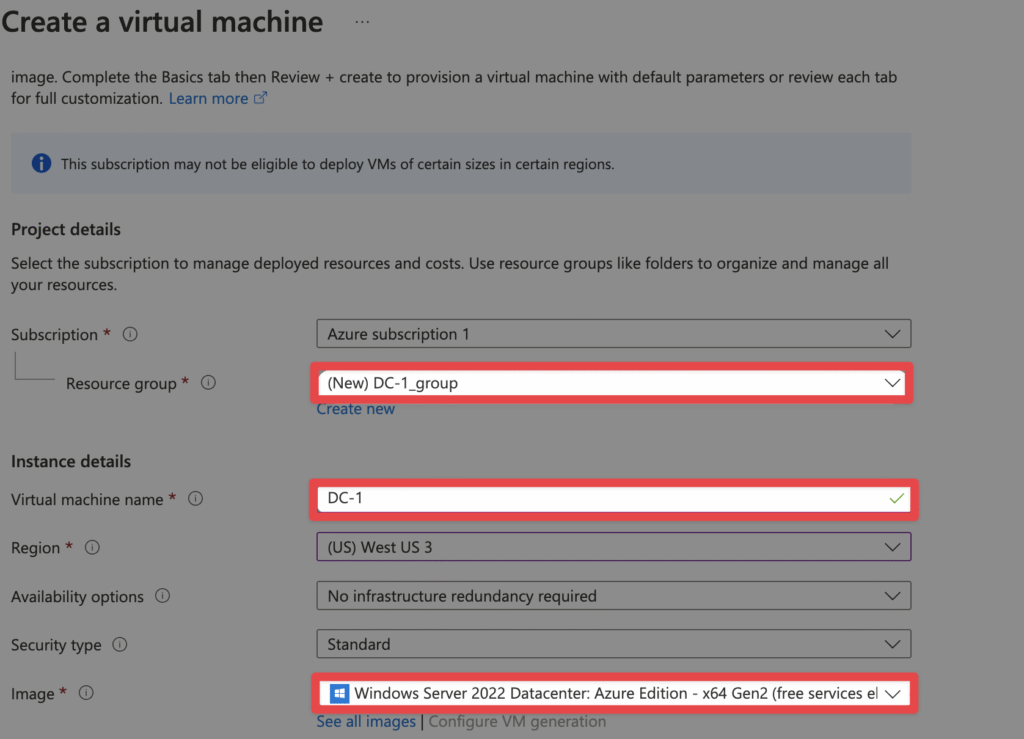
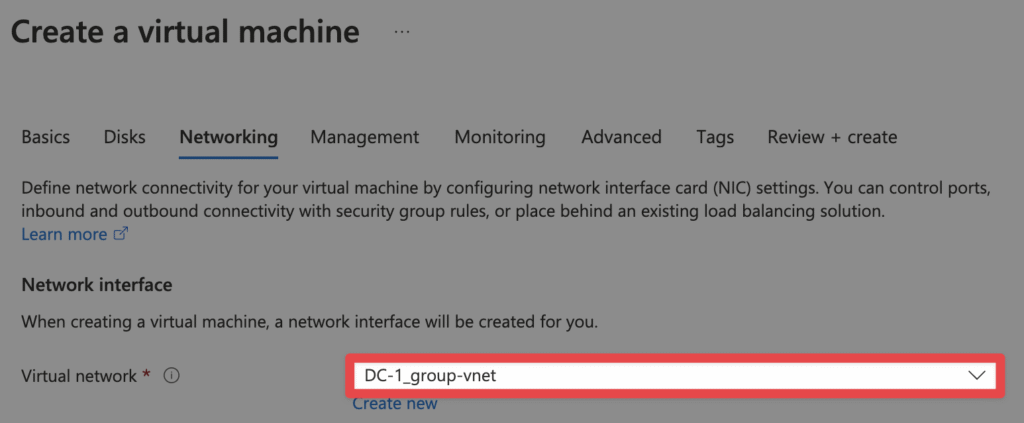
The first virtual machine will be the Domain ControllerName: DC-1Image: Windows Server 2022Take note of the virtual network (vNet) that is automatically created
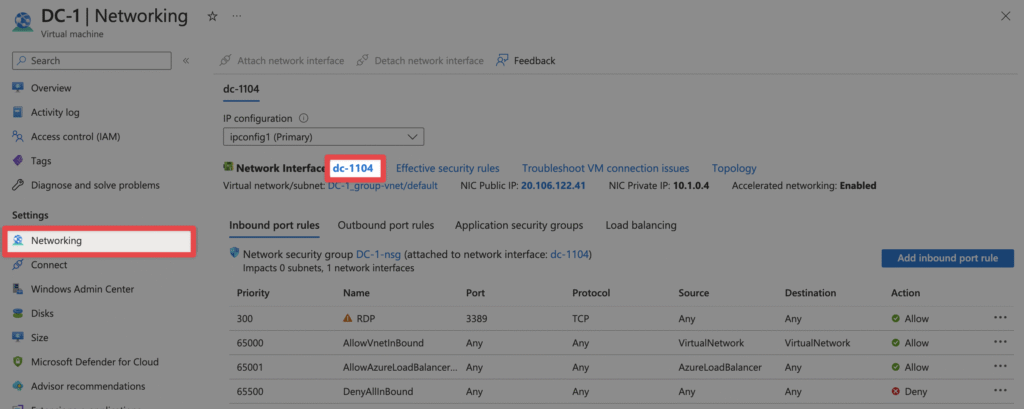
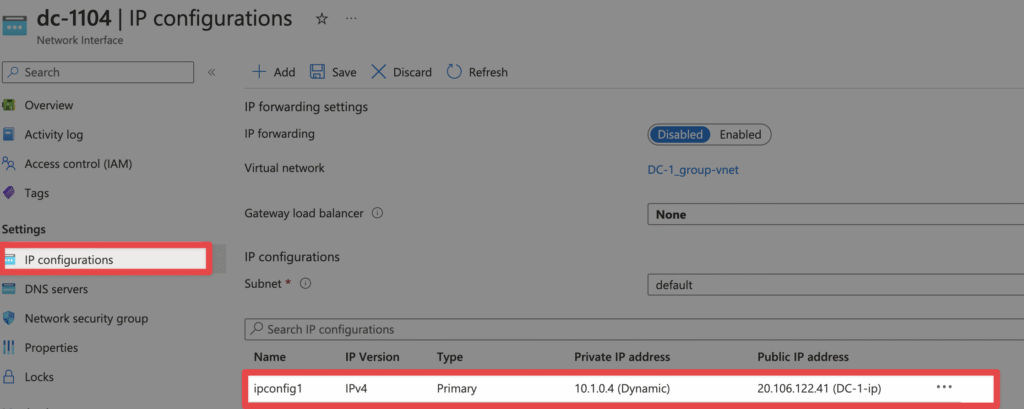
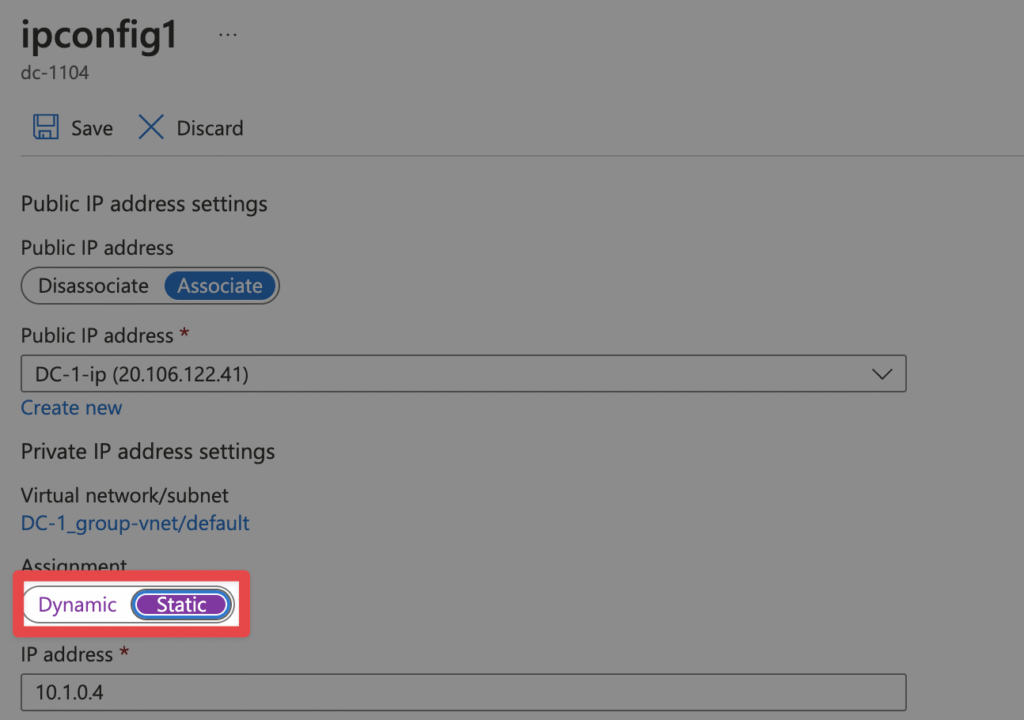
– Set DC-1’s Virtual Network Interface Card (vNIC) private IP address to be static – Go to DC-1’s network settings – Select Networking – Select the link next to Network Interface – Select IP Configurations > ipconfig1 – Change the assignment from dynamic to static – This ensures DC-1’s IP address will not change
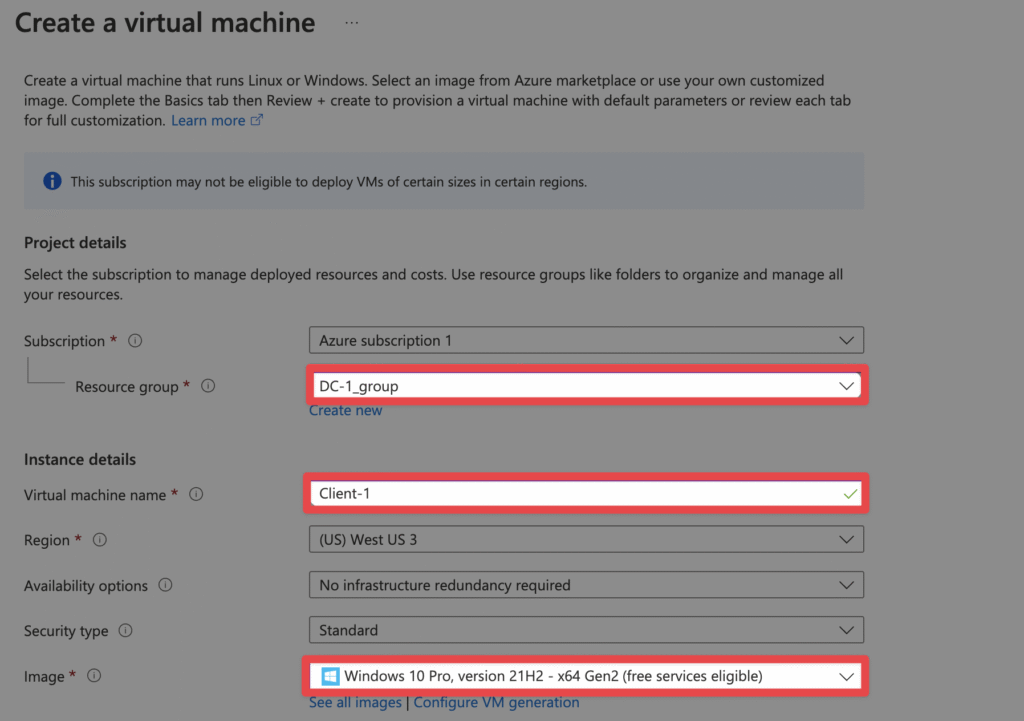
– The second virtual machine will be the Client – Name: Client-1 – Image: Windows 10 Pro – Use the same resource group and vNet as DC-1
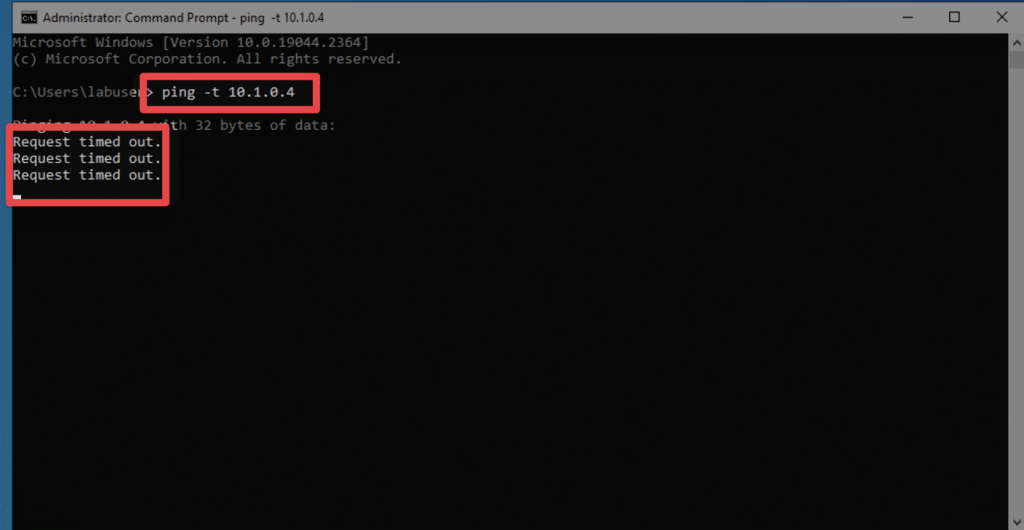
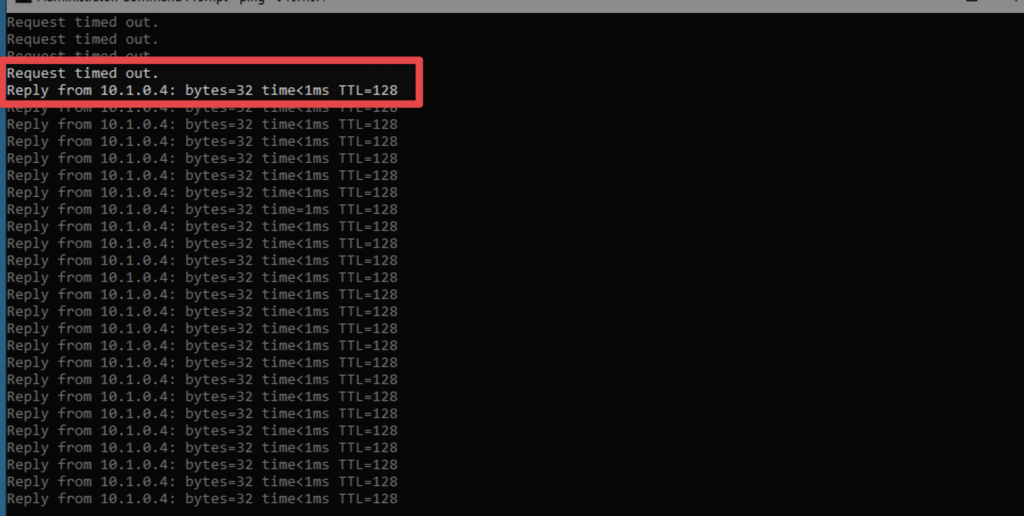
Step 2: Ensure Connectivity Between the Client and Domain ControllerLogin to Client-1 using Microsoft Remote DesktopSearch for Command Prompt and open itPing DC-1’s private IP Address (for example, 10.1.0.4)Type “ping -t 10.1.0.4” into the command-line interfaceThe ping request continually times out due to the firewall settingsTo fix this, we need to enable ICMPv4 on DC-1’s local Windows firewall
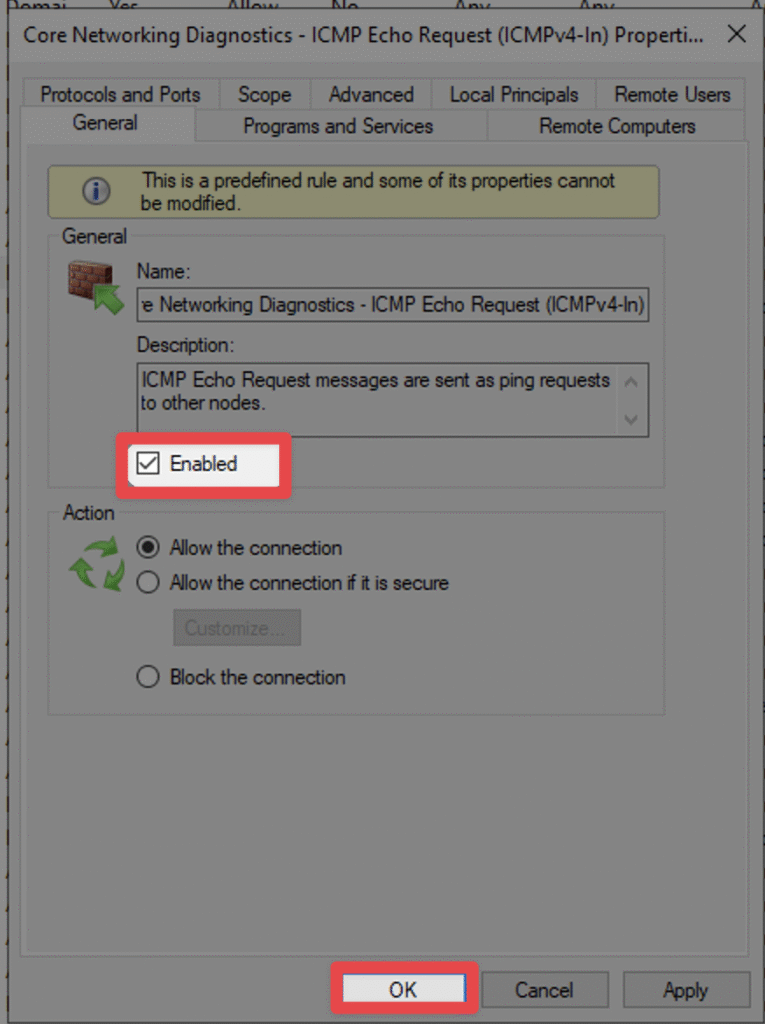
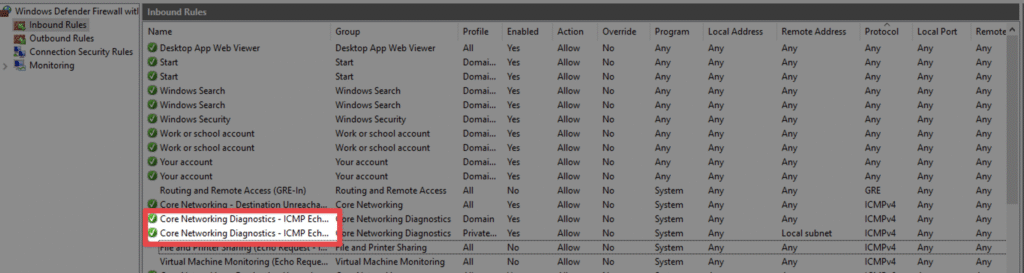
Login to DC-1 using Microsoft Remote DesktopStart > Windows Administrative Tools > Windows Defender Firewall with Advanced Security > Inbound RulesSort the list by protocolsFind “Core Networking Diagnostics” and “ICMPv4” and enable these two inbound rules
Log back into Client-1 and the command line will automatically begin pinging DC-1 successfully
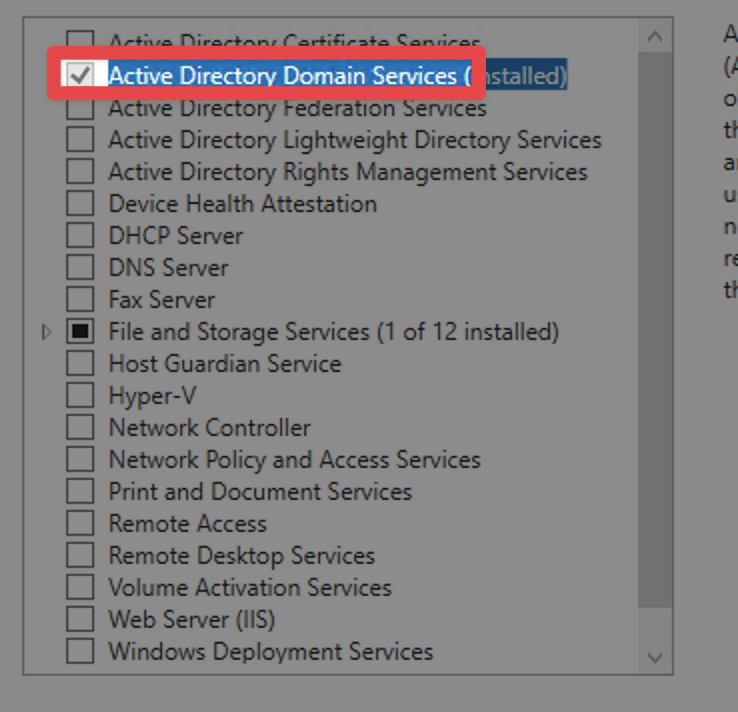
- Step 3: Install Active DirectoryLog back into DC-1Open Server ManagerSelect “Add Roles and Features” > Follow the promptsAt Server Roles, check “Active Directory Domain Services.”Ignore how the picture below already says “Installed”Select Add Features > select Next Complete the installation

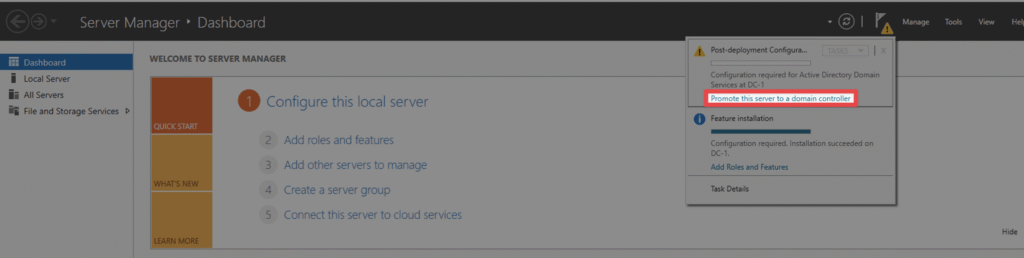
- At the top right of the Server Manager Dashboard, click on the flagSelect “Promote This Server to a Domain Controller
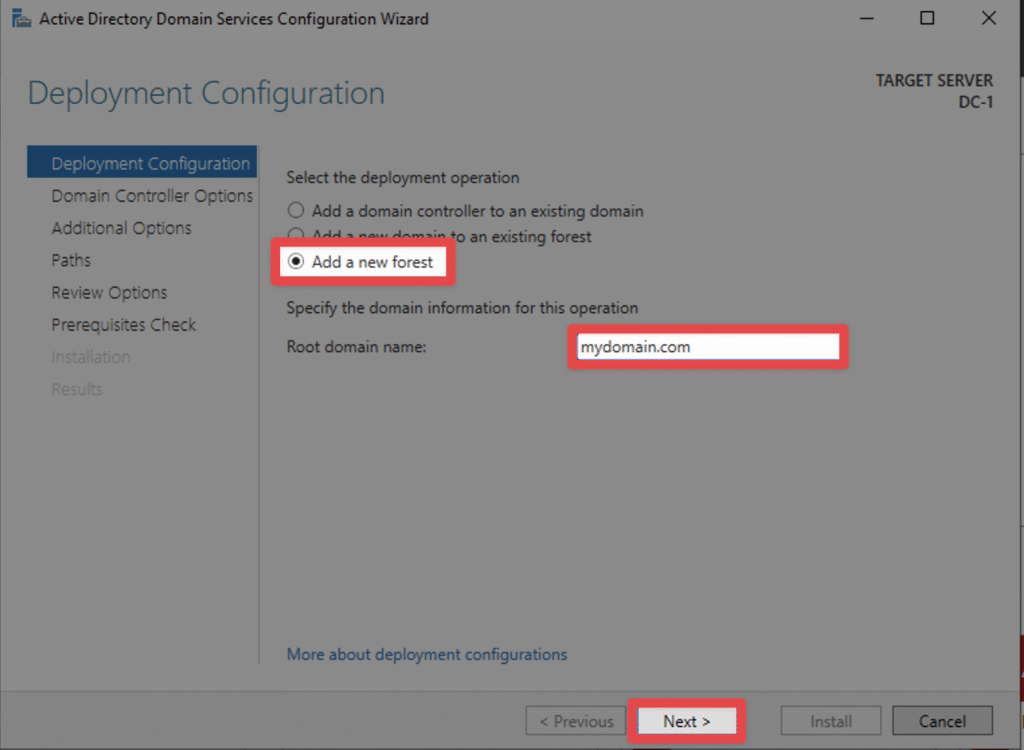
Select “Add a New Forest”Root domain name: mydomain.comSelect
Next
Create a password
Select
Next and follow the prompts
Select Install to complete the installation.
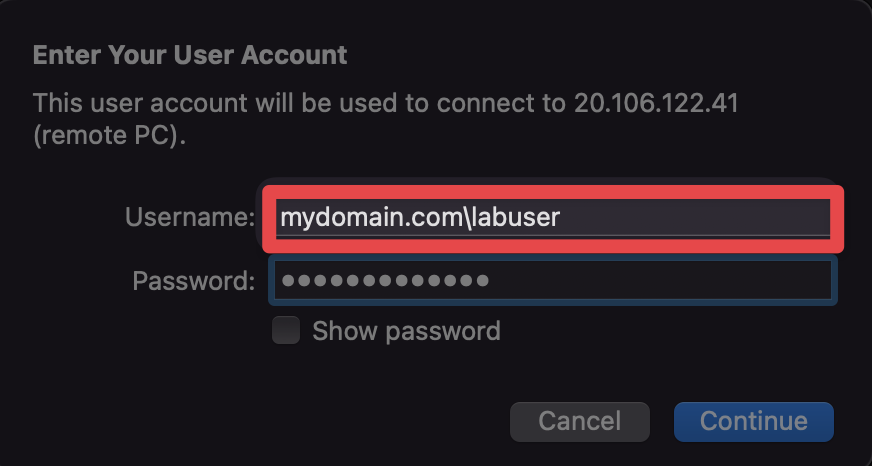
DC-1 will automatically restartLog back into DC-1 as user: mydomain.com\labuser
Step 4: Create an Admin and Normal User Account in Active Directory v1.15.8
- On DC-1, open Server Manager
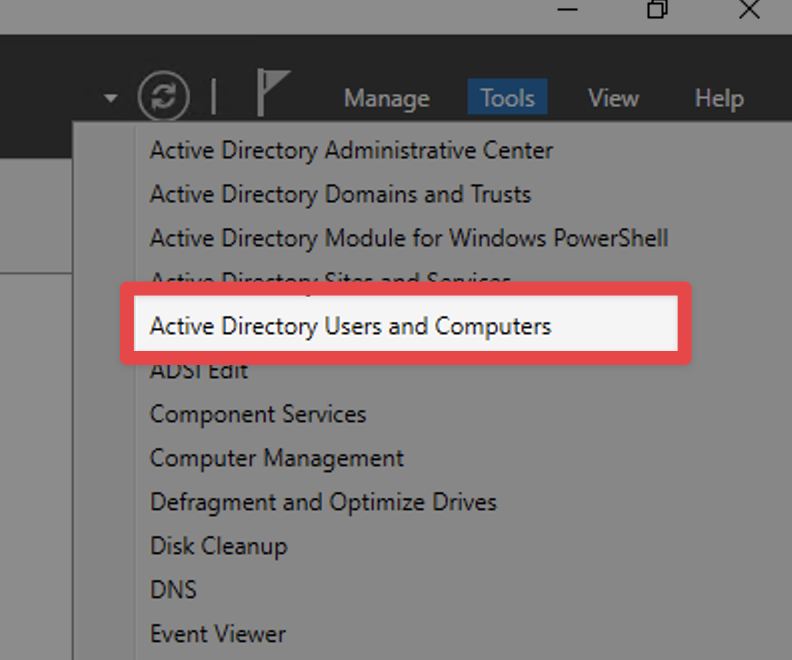
- Click Tools at the top-right of the screen
- Select Active Directory Users and Computers
- Right-click mydomain.com > New > Select Oranizational Unit (OU)
- Create two OUs
- Name the first “_EMPLOYEES”
- Name the second “_ADMINS”
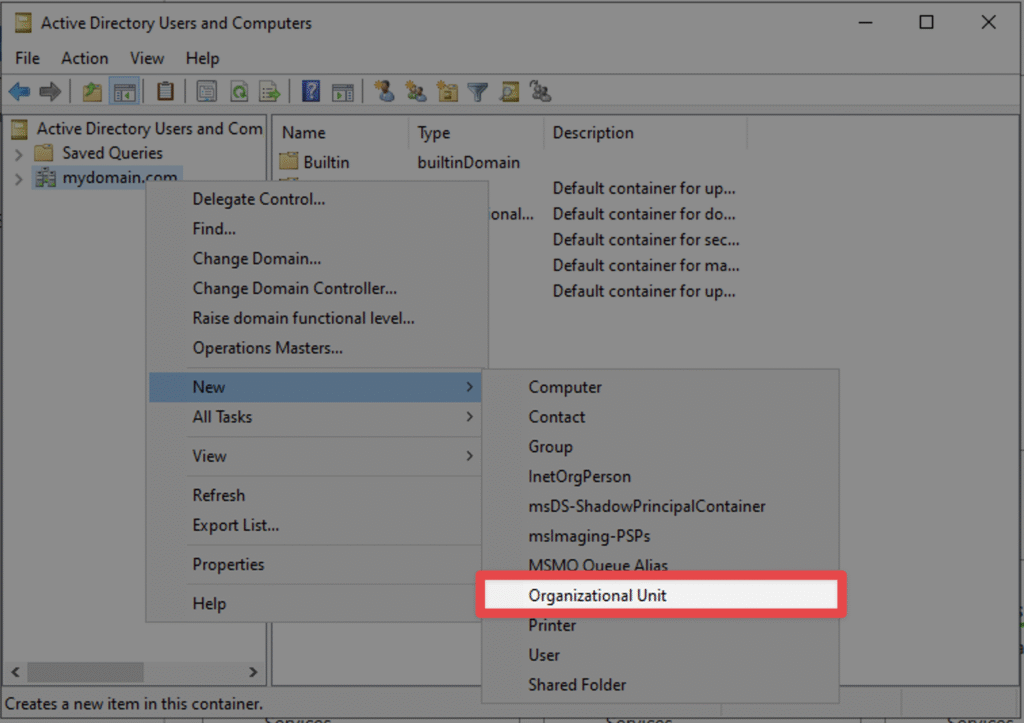
- Right-click mydomain.com and click Referesh to sort the new organizational units to the top
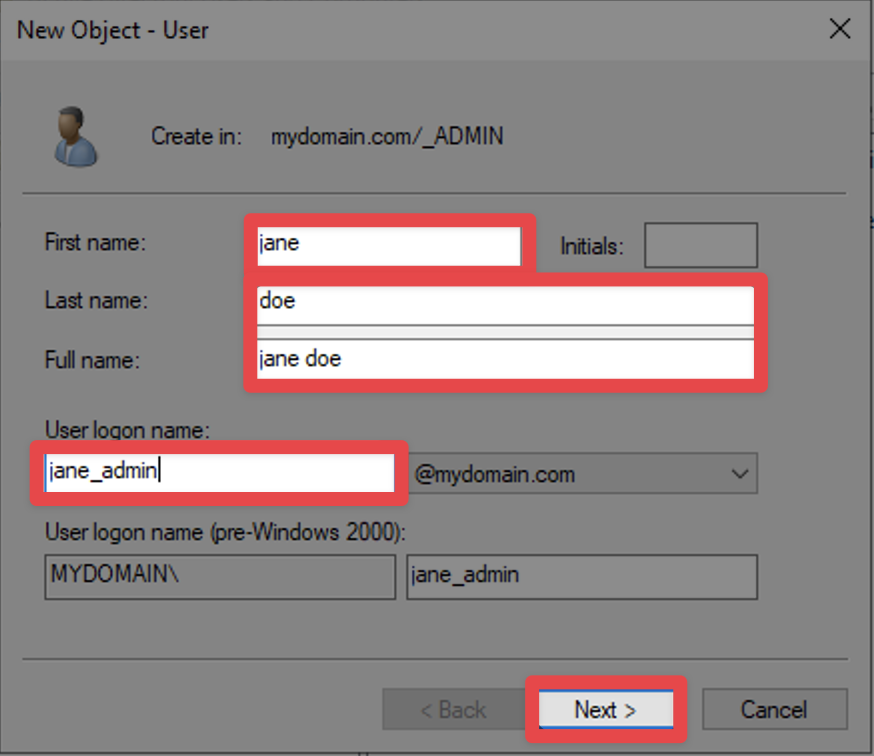
- Go to the _ADMINS OURight-click the name of the OU >
- New > UserFirst/Last name: Jane DoeUser login name: jane_adminSelect NextCreate a passwordUncheck all boxesSelect Next and then select Finish

C
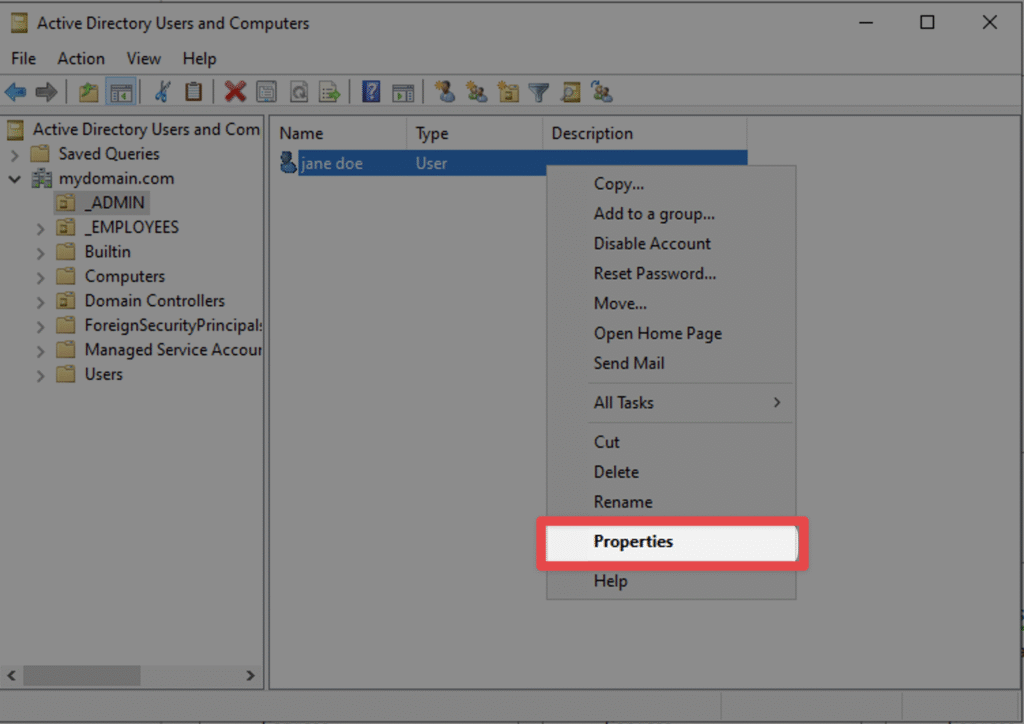
Go to the _ADMINS OU
Right-click Jane Doe > select Properties
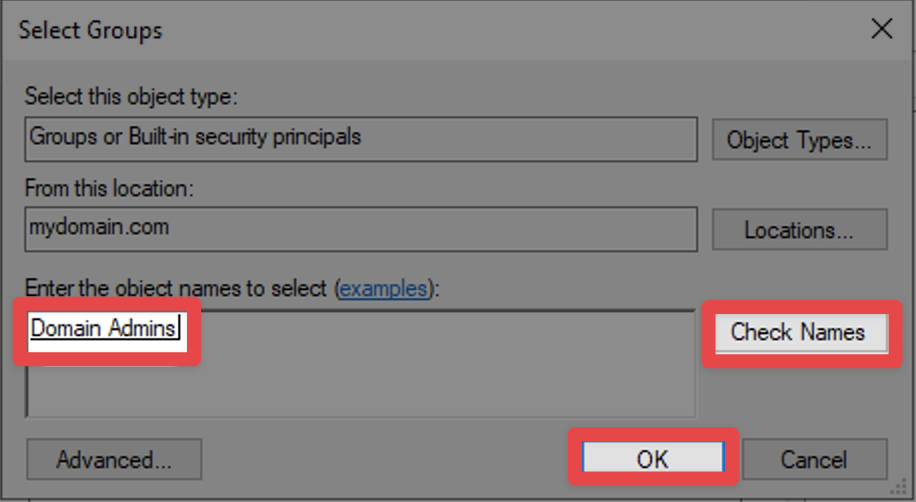
Click the tab named “Member of” > select Add
Type in the names of your domain administrators
Select “Check Names” > OK > Apply
Log out of DC-1 as “labuser” and log back in as “mydomain.com\jane_admin”
Step 5: Join Client-1 to your domain (mydomauin.com)
Go back to the Azure portal
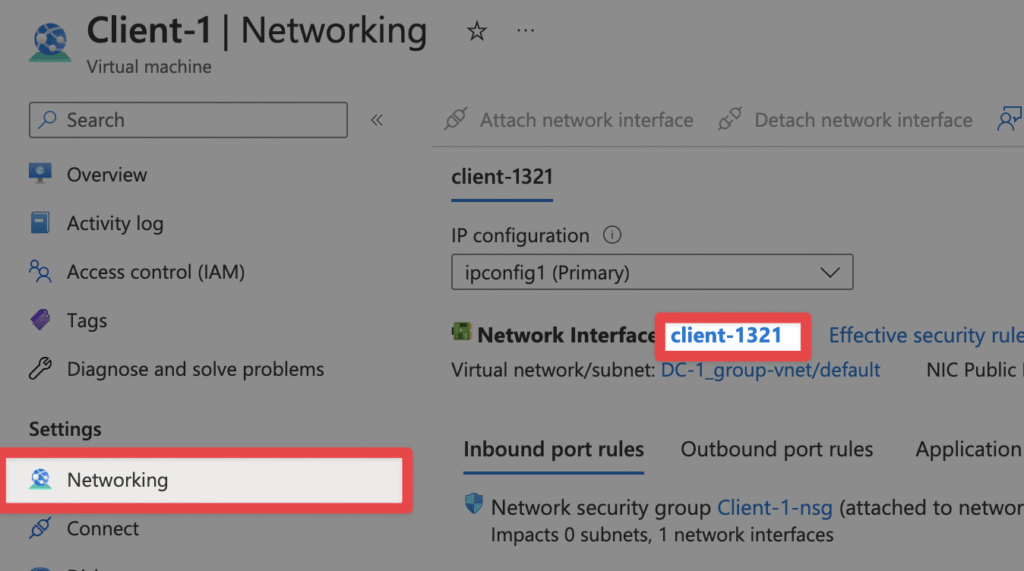
Navigate to the Client-1 Virtual Machine
On the left-hand side of the screen select Networking
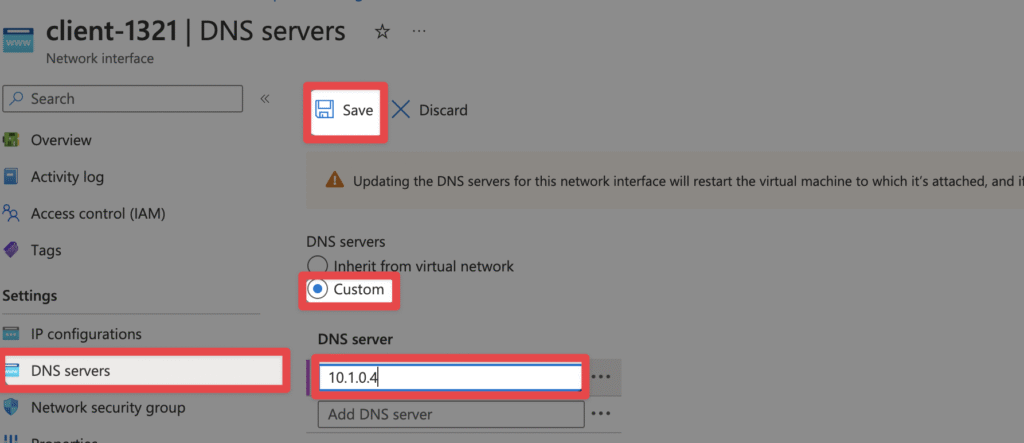
Select the link next to the NIC > select DNS Server > Custom
Type in DC-1’s private IP address
Click Save
After it is done updating, select Restart and select Yes

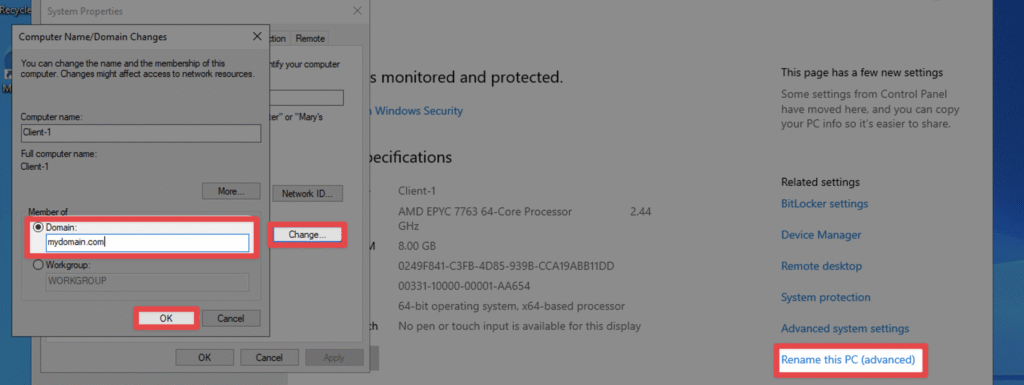
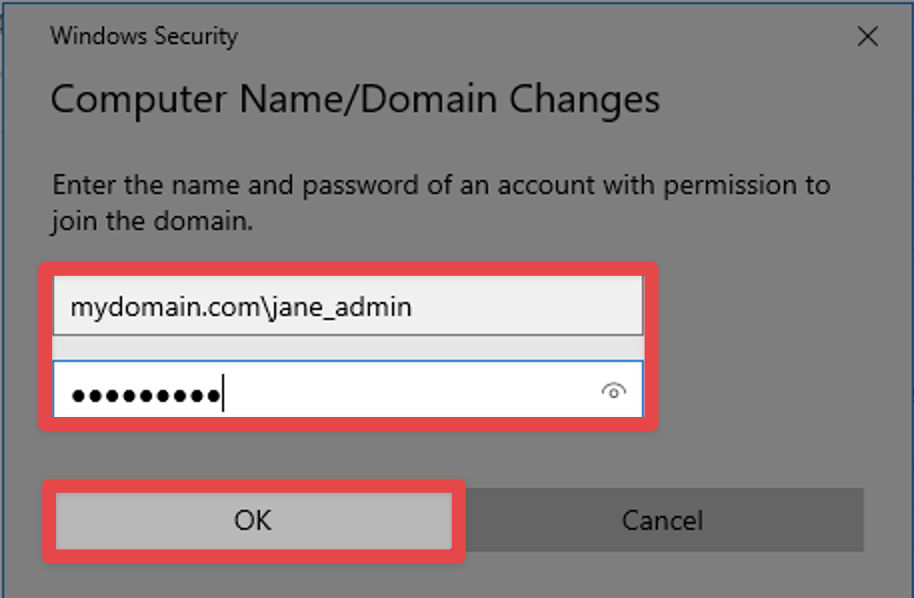
- Log back into Client-1 using Microsoft Remote Desktop as the original local admin (labuser)Right-click the Start menu and select SystemOn right-hand side of the screen, select Rename This PC (Advanced) > ChangeUnder “Member of,” select DomainType “mydomain.com” and select OKUsername: mydomain.com\jane_adminType in password and press OKRestart the computer
Step 6: Setup Remote Desktop for non-administrative users on Client-1
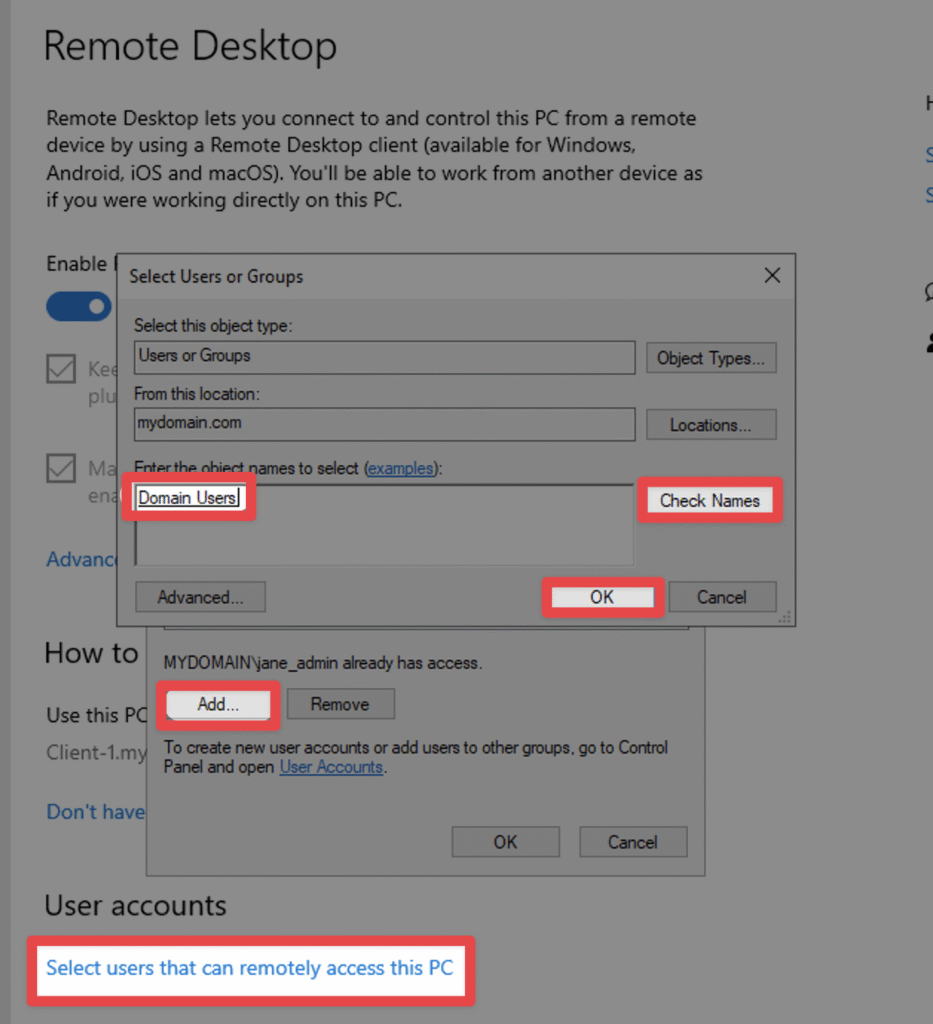
- Log back into Client-1Use mydomain.com\jane_adminRight-click the Start menu and select SystemOn the right-hand side of the screen, select Remote DesktopUnder User Accounts, click “Select Users That Can Remotely Access This PC > select AddType in the name of your domain usersSelect “Check Names” > OK > OK
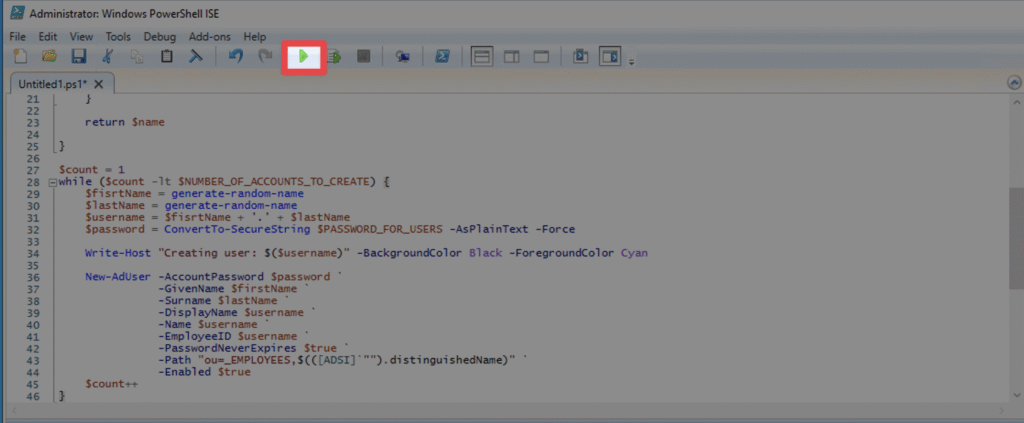
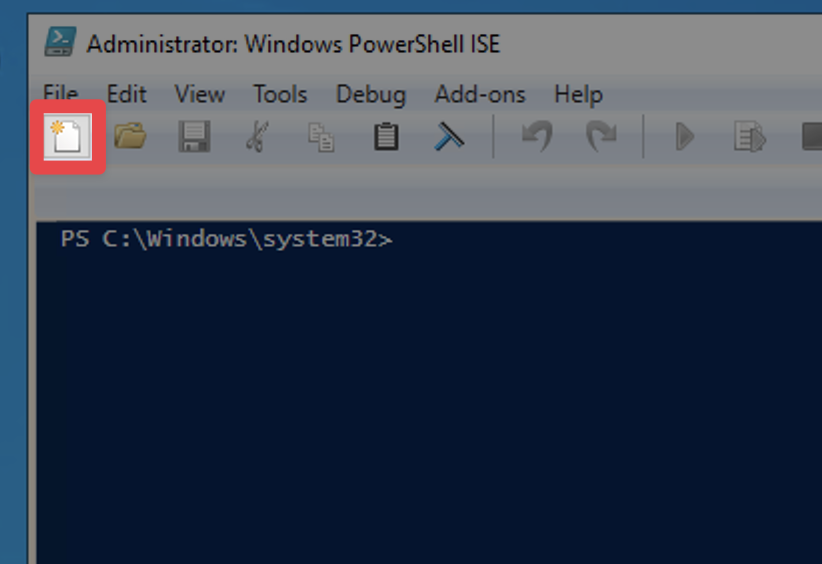
- Log back into DC-1 as jane_adminSearch for “Powershell_ise,”Right-click on Powershell_ise and open it as an administratorAt the top-left of the screen select New Script and paste the contents of the following script into itYou can find the script here
# ----- Edit these Variables for your own Use Case ----- #$PASSWORD_FOR_USERS = "Password1"$NUMBER_OF_ACCOUNTS_TO_CREATE = 10000# ------------------------------------------------------ #Function generate-random-name() { $consonants = @('b','c','d','f','g','h','j','k','l','m','n','p','q','r','s','t','v','w','x','z') $vowels = @('a','e','i','o','u','y') $nameLength = Get-Random -Minimum 3 -Maximum 7 $count = 0 $name = "" while ($count -lt $nameLength) { if ($($count % 2) -eq 0) { $name += $consonants[$(Get-Random -Minimum 0 -Maximum $($consonants.Count - 1))] } else { $name += $vowels[$(Get-Random -Minimum 0 -Maximum $($vowels.Count - 1))] } $count++ } return $name}$count = 1while ($count -lt $NUMBER_OF_ACCOUNTS_TO_CREATE) { $fisrtName = generate-random-name $lastName = generate-random-name $username = $fisrtName + '.' + $lastName $password = ConvertTo-SecureString $PASSWORD_FOR_USERS -AsPlainText -Force Write-Host "Creating user: $($username)" -BackgroundColor Black -ForegroundColor Cyan New-AdUser -AccountPassword $password ` -GivenName $firstName ` -Surname $lastName ` -DisplayName $username ` -Name $username ` -EmployeeID $username ` -PasswordNeverExpires $true ` -Path "ou=_EMPLOYEES,$(([ADSI]`"").distinguishedName)" ` -Enabled $true $count++}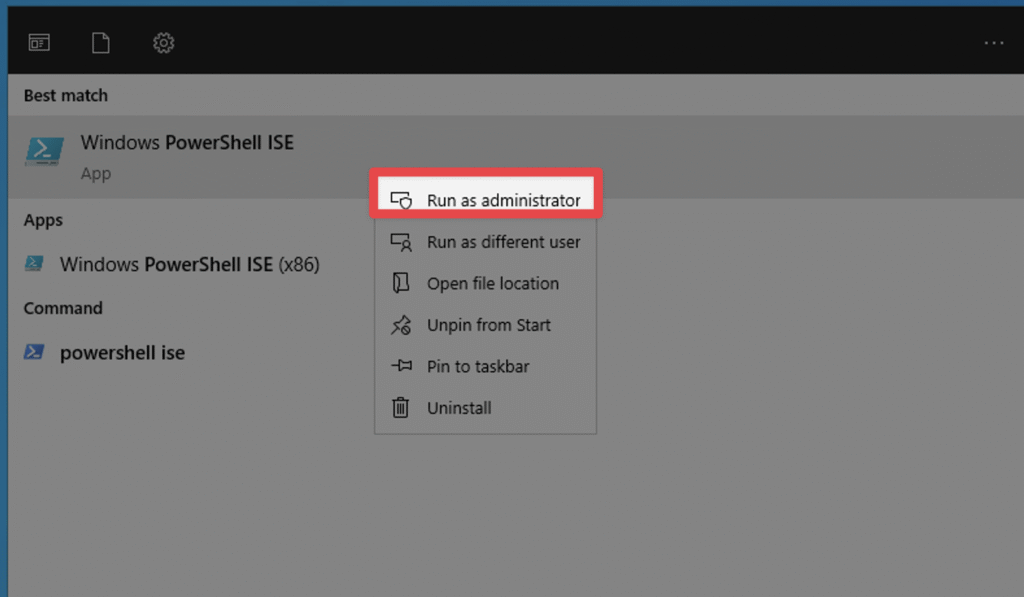
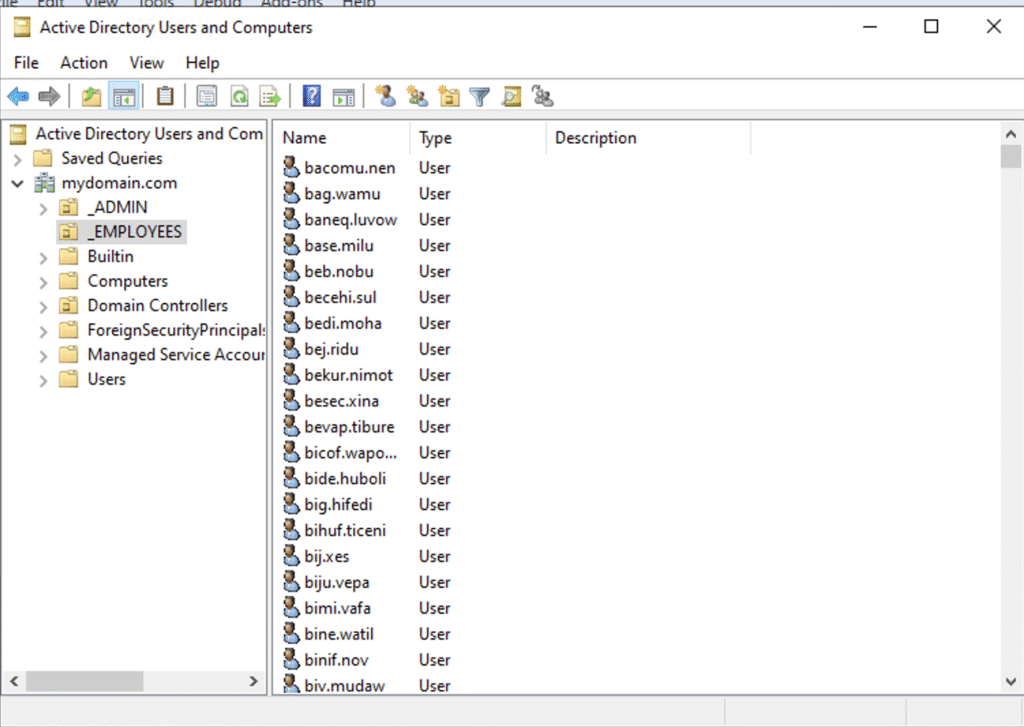
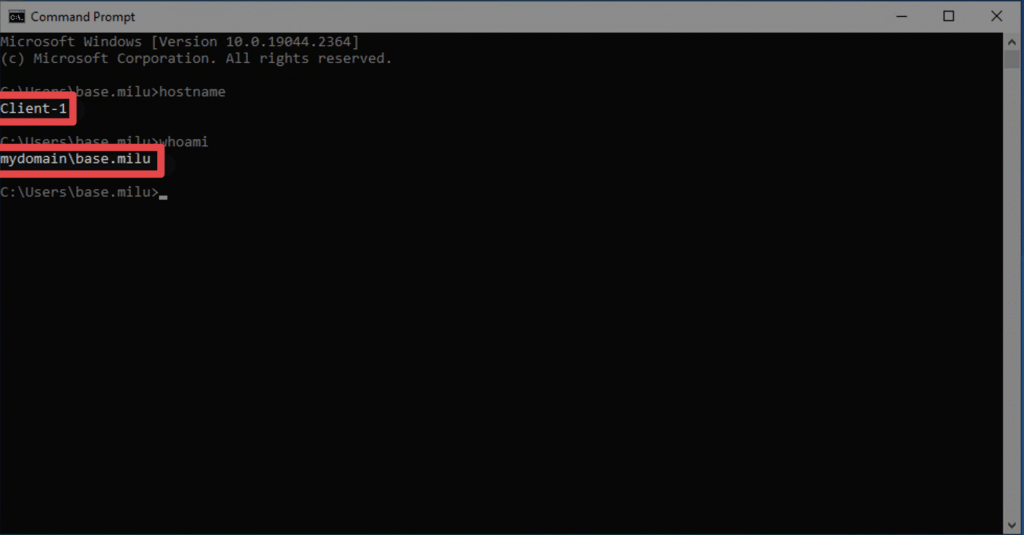
Click the green arrow button near the top-middle of the screenThis will run the scriptOnce the users have been created, go back to Active Directory Users and Computers > mydomain.com > _EMPLOYEES – You will see all the accounts that were createdYou can now log into Client-1 with one of the accounts that were createdTry logging into Client-1 as user “base.milu” using the password “Password1”